A FREE step-by-step guide to create your own website in 3 hours without ANY coding skills
Table of content
Class aptent taciti sociosqu ad litora torquent per conubia nostra, per inceptos
Himenaeos. Sed molestie, velit ut eleifend sollicitudin, neque orci tempor nulla, id sagittis nisi ante nec arcu.
Section 2 - Back end: Installations and adjusting settings
1. Installing WordPress
1.1 WordPress Dashboard
2. Install and activate Divi Theme
3. Install security plugins
3.1 Install, activate and optimize Wordfence Security plugin
3.2 Install and activate the UpdraftPlus plugin
4. Adding logo and favicon to your website
5. Adjusting the WordPress General setting
1hr. 10min.
Section 1 – Buy Hosting/Domain and a Theme
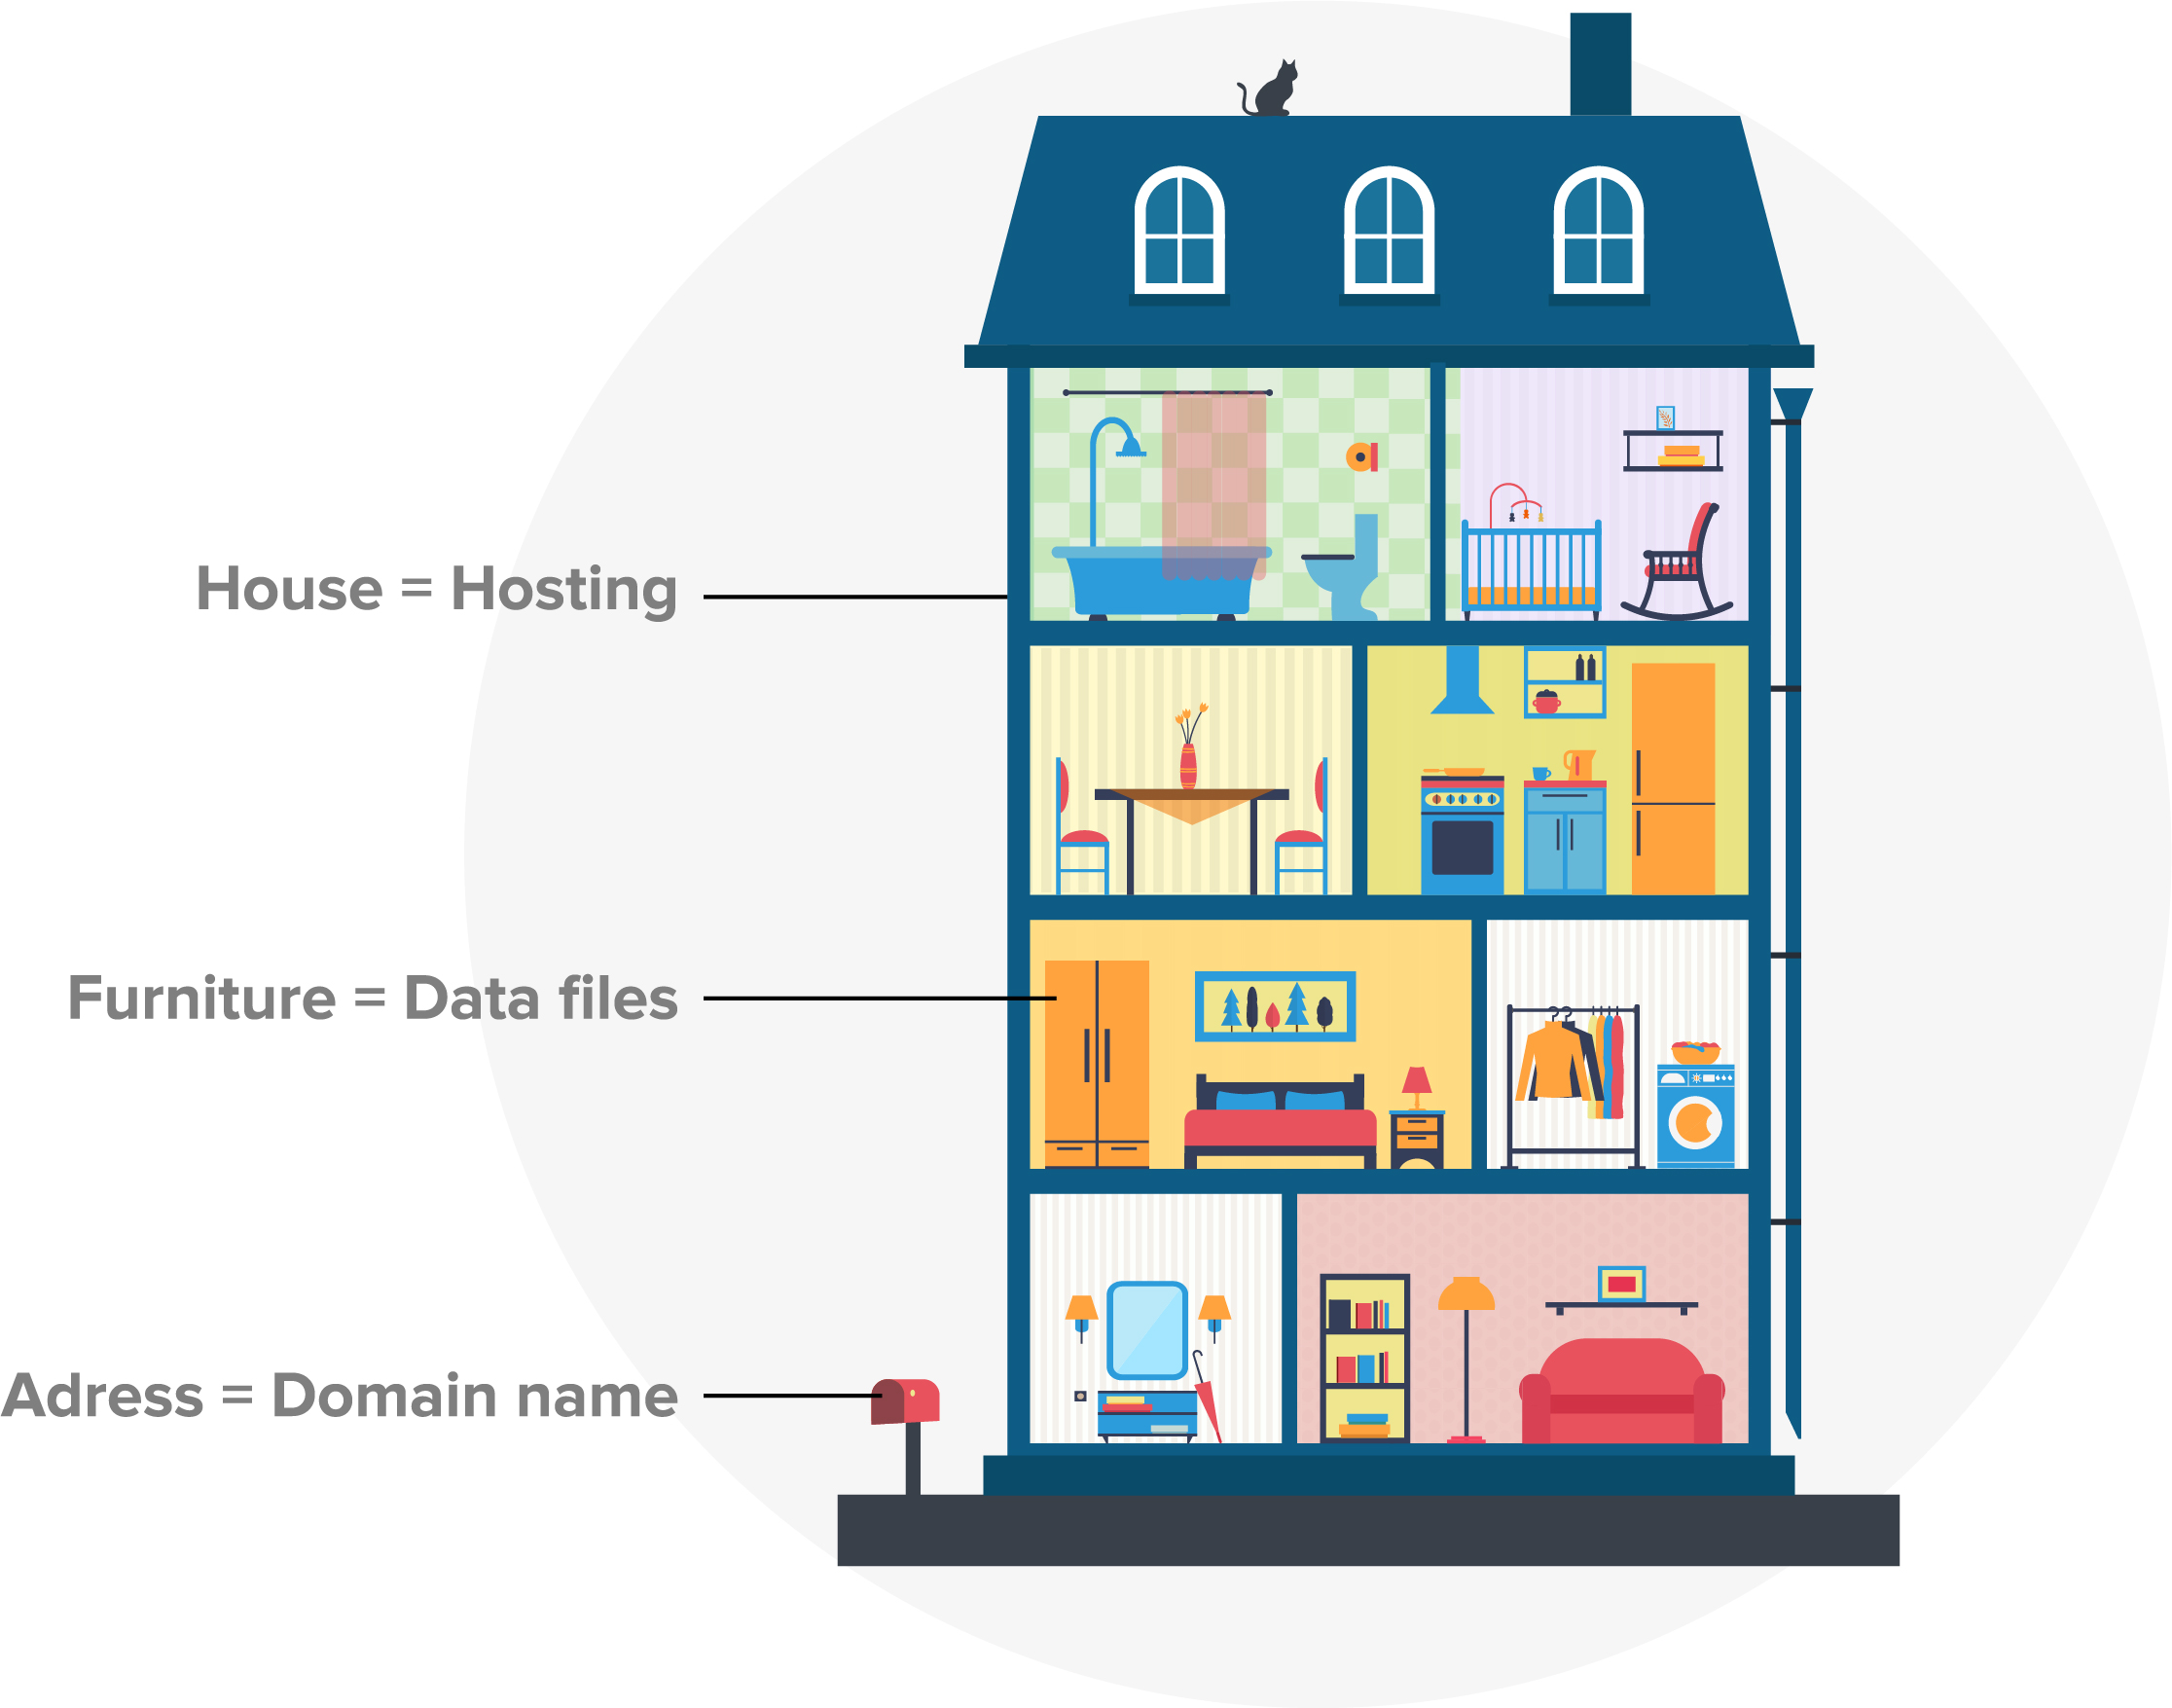
Alright, here’s how you can create your own website. To be able to create a website you’ll need a domain, a hosting account and a theme where you’ll build your site.
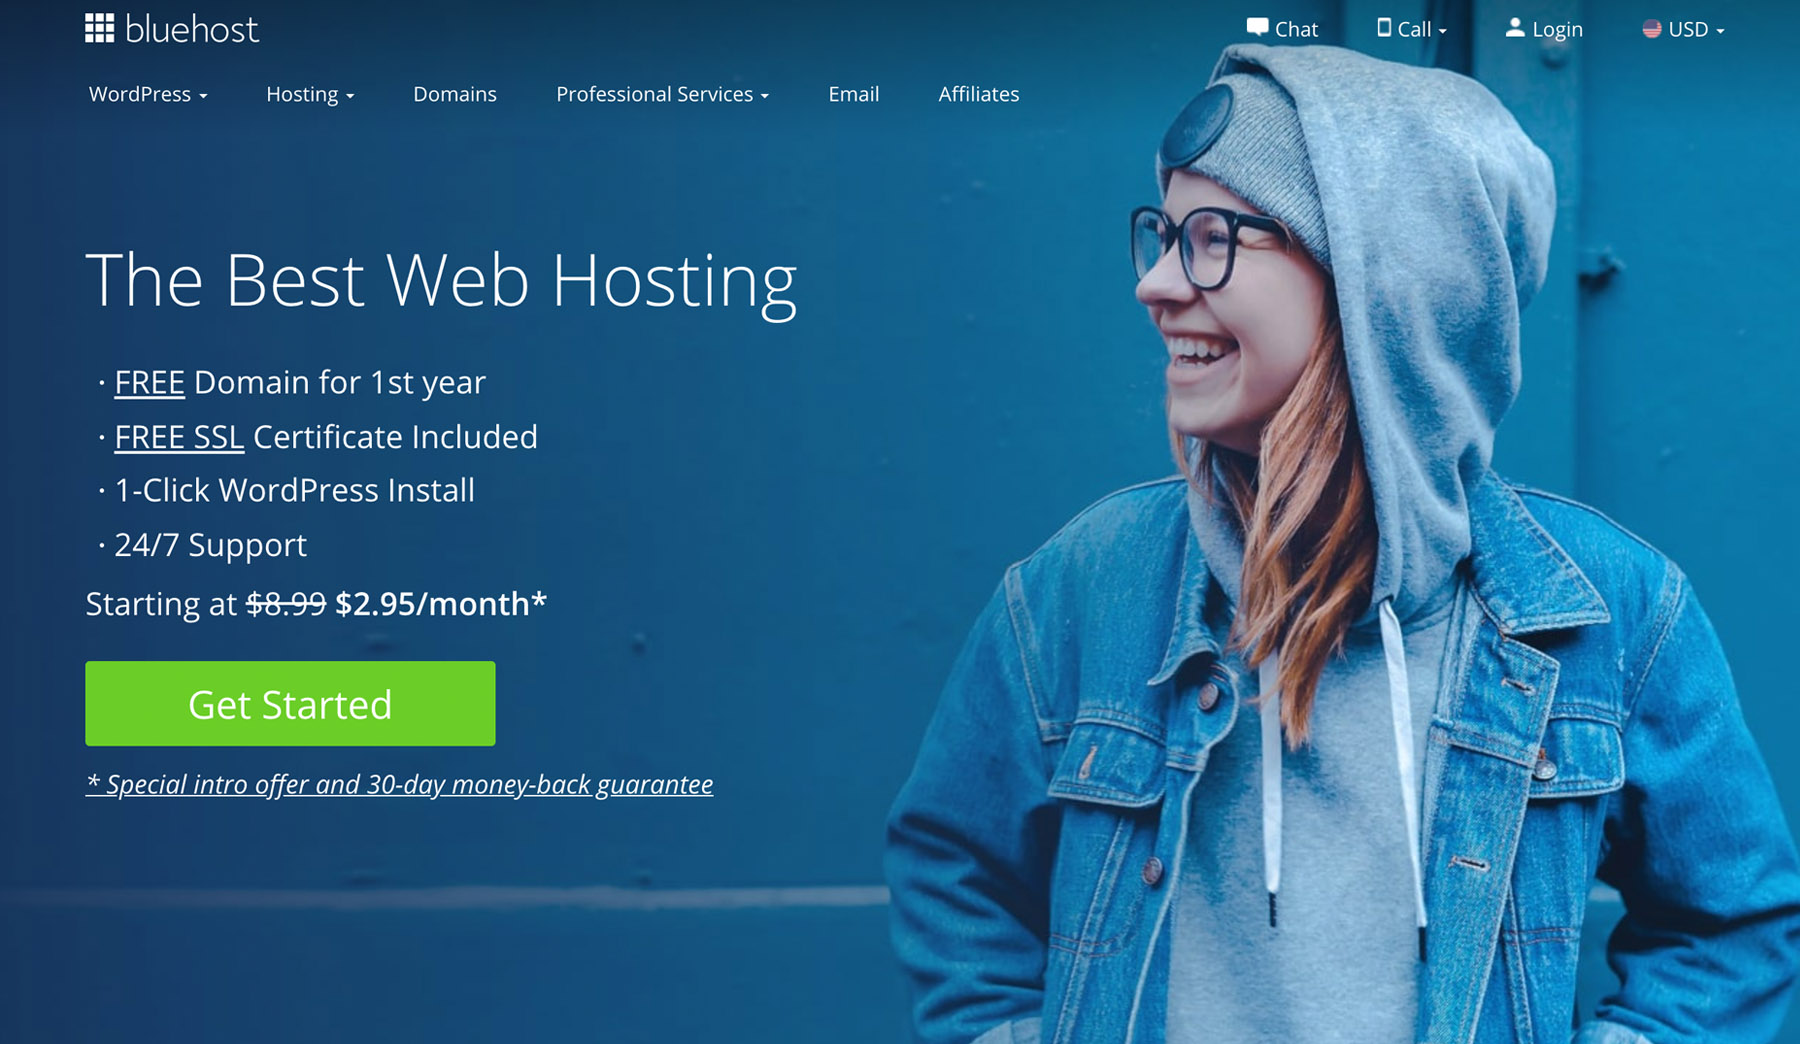
All of our sites are operated by Bluehost (domain and hosting) and we cannot recommend them enough. When choosing a hosting provider, maybe the most important part is their customer service. Bluehost has probably the best customer service (24/7) in the biz.
We use Elegant themes to create the websites. And we mainly use their awesome Divi theme, which lets you drag and drop information exactly where you want – without any coding skills.
Before we can build our website, we have to purchase domain and hosting from Bluehost and themes from Elegant themes.
Bluehost – Domain and Hosting
First off, jump on to Bluehost by clicking this link. By using this link, there is no additional cost for you whatsoever, however Bluehost will give me a small affiliate earning for referring you to them.
Choose a domain name.
If you know that you are going to have your website for the foreseeable future, then it’s better to go for the 36 months payment directly. That will give you a nice discount. However, if you are strapped for money, there is no problem with taking the 12 month program. You can always change it at a later stage if needed.
You’re going to get a lot of extra choices to purchase. To be honest, you’ll probably only need the hosting, domain and privacy protection. Privacy protection stops salespeople from contacting you among other things. The fee is quite small so I would recommend you go for it.
When it comes to some of the other things Bluehost recommends to you such as SiteLock Security, there are some free plugins that will do the trick. If you are still unsure on what to do, just send us a message.
By the way, you can create as many websites you want with one hosting account. The button below will take you to Bluehost’s official website, where you can purchase your domain and hosting.
Elegant themes – Theme
Let’s move on to Elegant themes by clicking this link. By using this link, there is no additional cost for you whatsoever, however, Elegant Themes will give me a small affiliate earning for referring you to them.

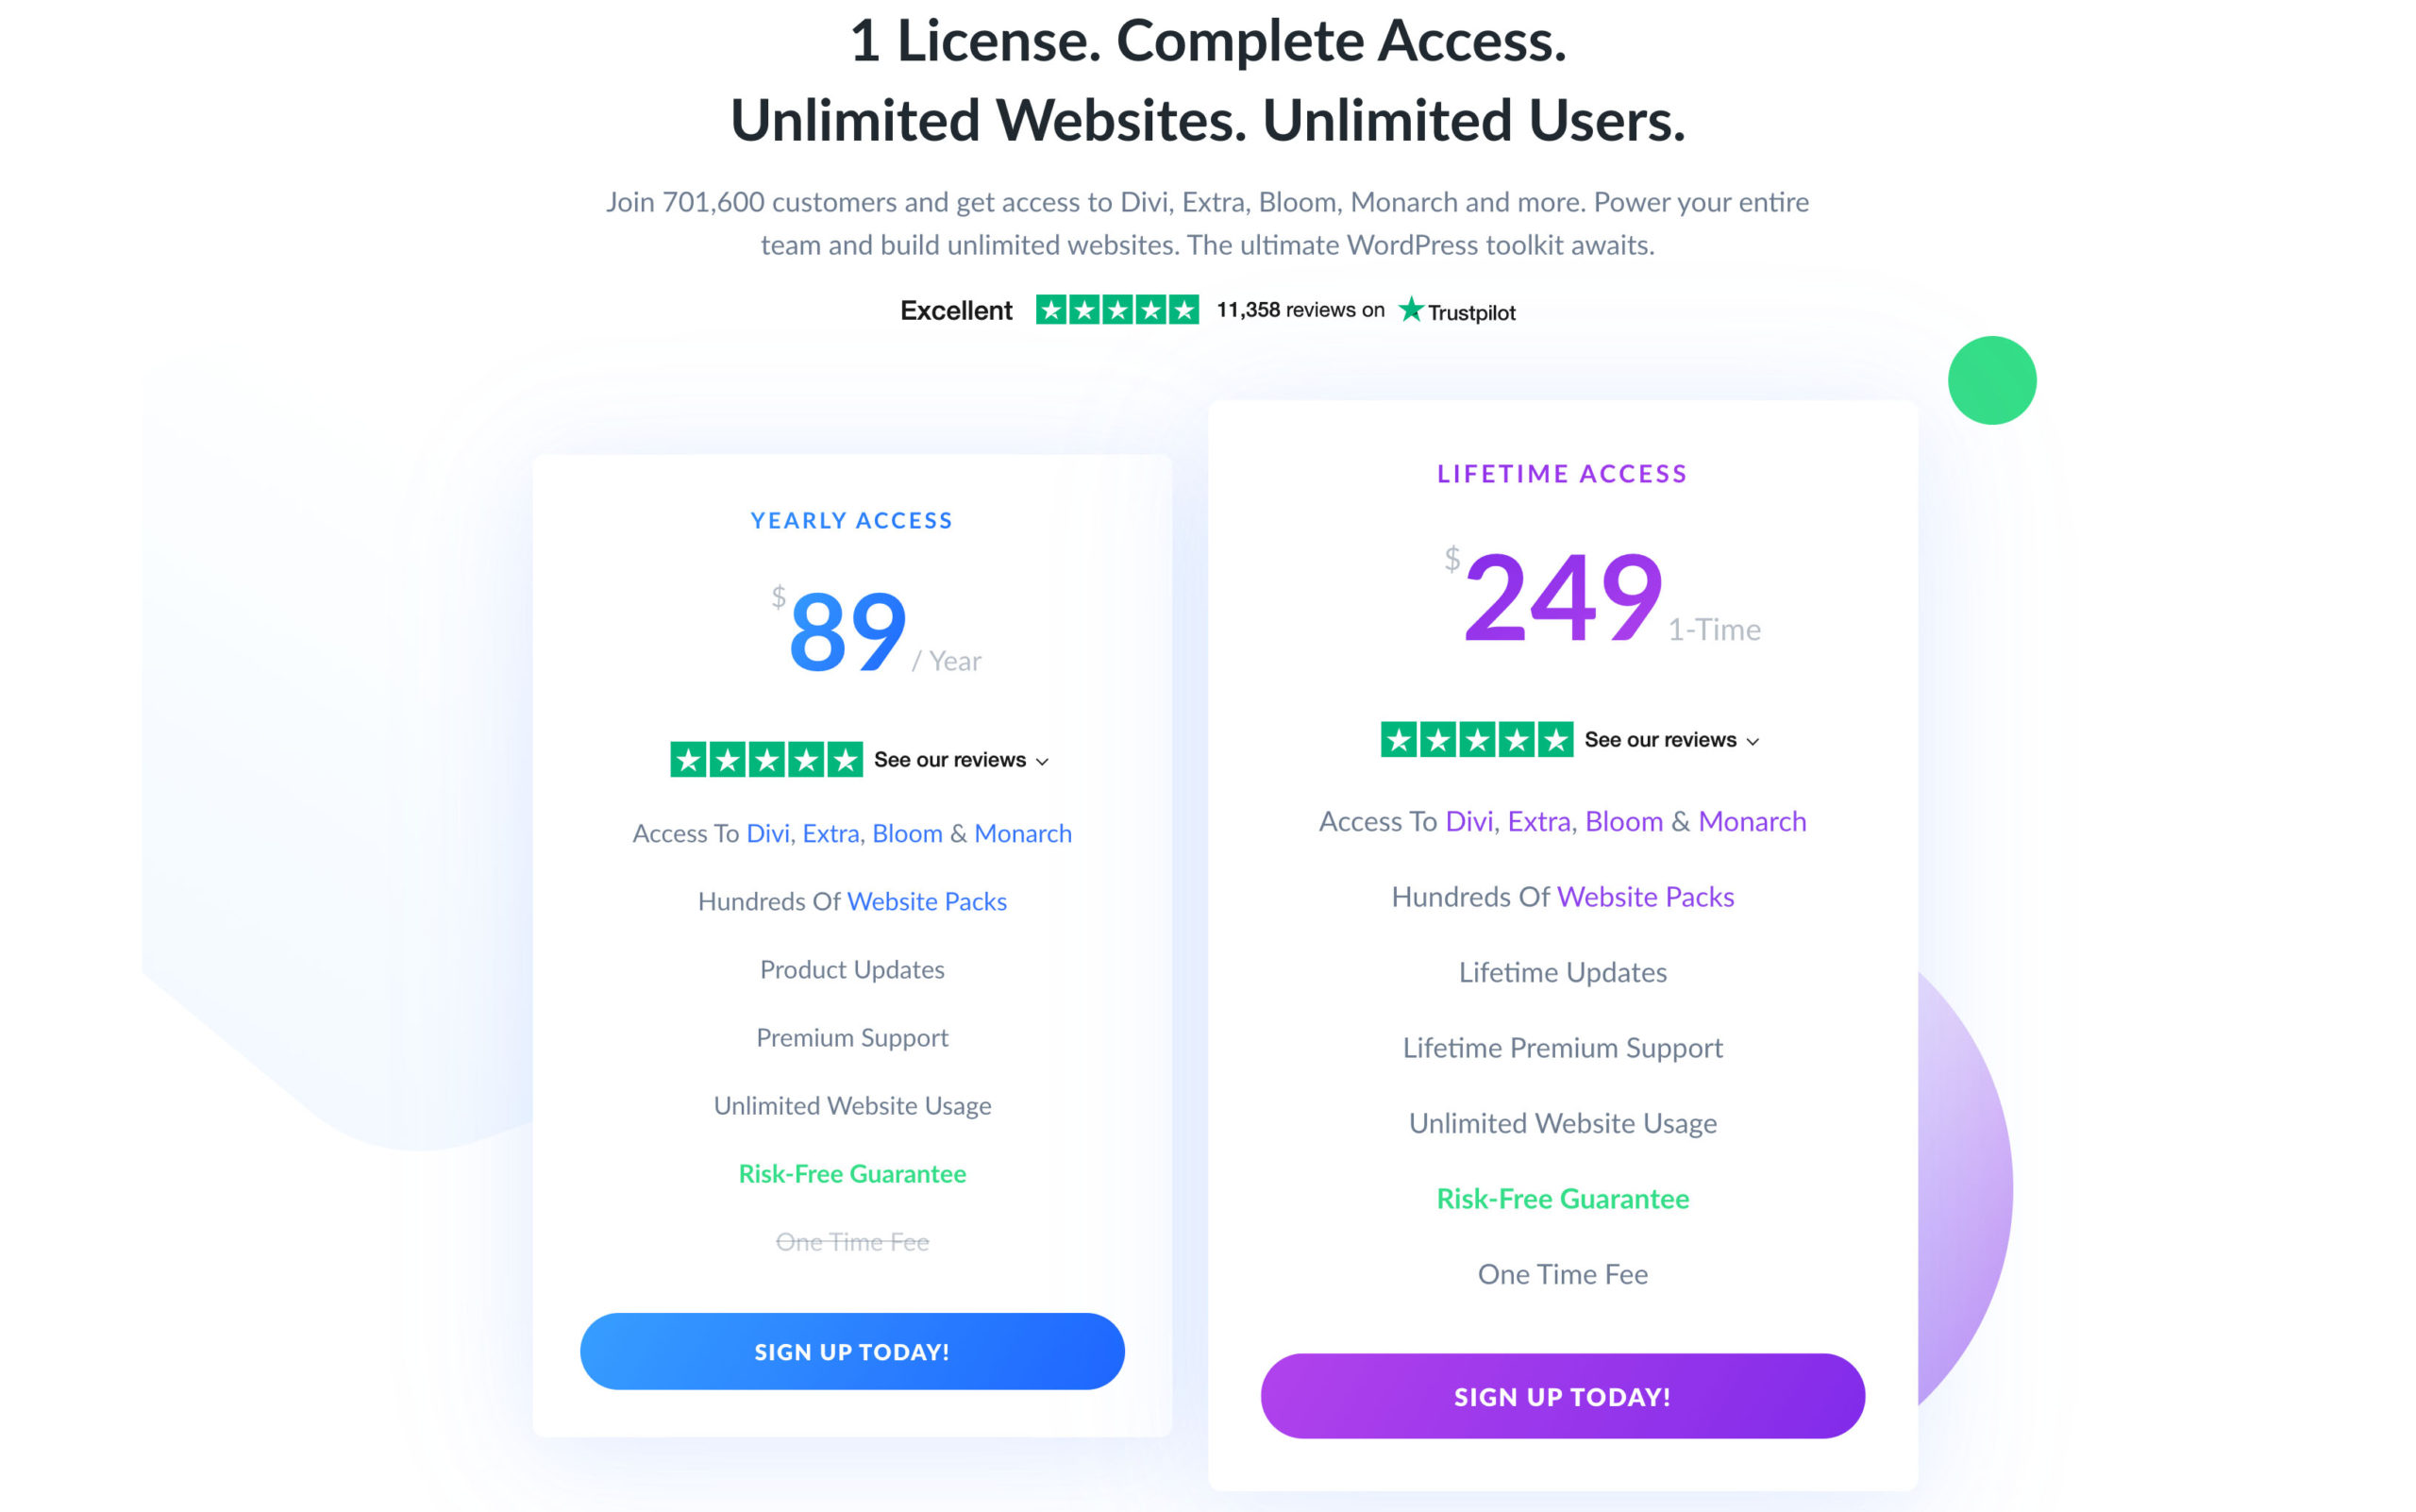
I definitely recommend you to get lifetime access instead of paying for the yearly fee. I have saved so much money doing this. So if you know that you are going to have a website for longer than 3 years, the lifetime access is the one to go for. Elegant themes also has a 30-day money back guarantee which is great. Elegant themes has hundreds of themes and as a customer you can use as many of them as you want.
The button below will take you to the Elegant Themes official website, where you can purchase your Theme.
Section 2 – Back end: Installations and adjusting settings
Install WordPress
Follow the steps below to install WordPress:
- Log in to your Bluehost account
- Click on the “My Sites” tab from the side navigation bar to the left.
- Click on “Create Site” or “Add Site”
- Click on “Use WordPress”
- Enter Admin Information
- Site Name: This will be the name displayed on your site. This is not the URL, but simply the name used on your site.
- Site Tagline: This is where you write your site’s slogan, if you have any. Or you can write what your site is about in a short sentence.
- (Click on “Advanced”)
- Email Address: This will be where your login information will be sent.
- WordPress Admin Username: The desired login name for your application
- Please review this article on creating strong passwords.
- WordPress Admin Password: The desired password for this application
- Click “Next”
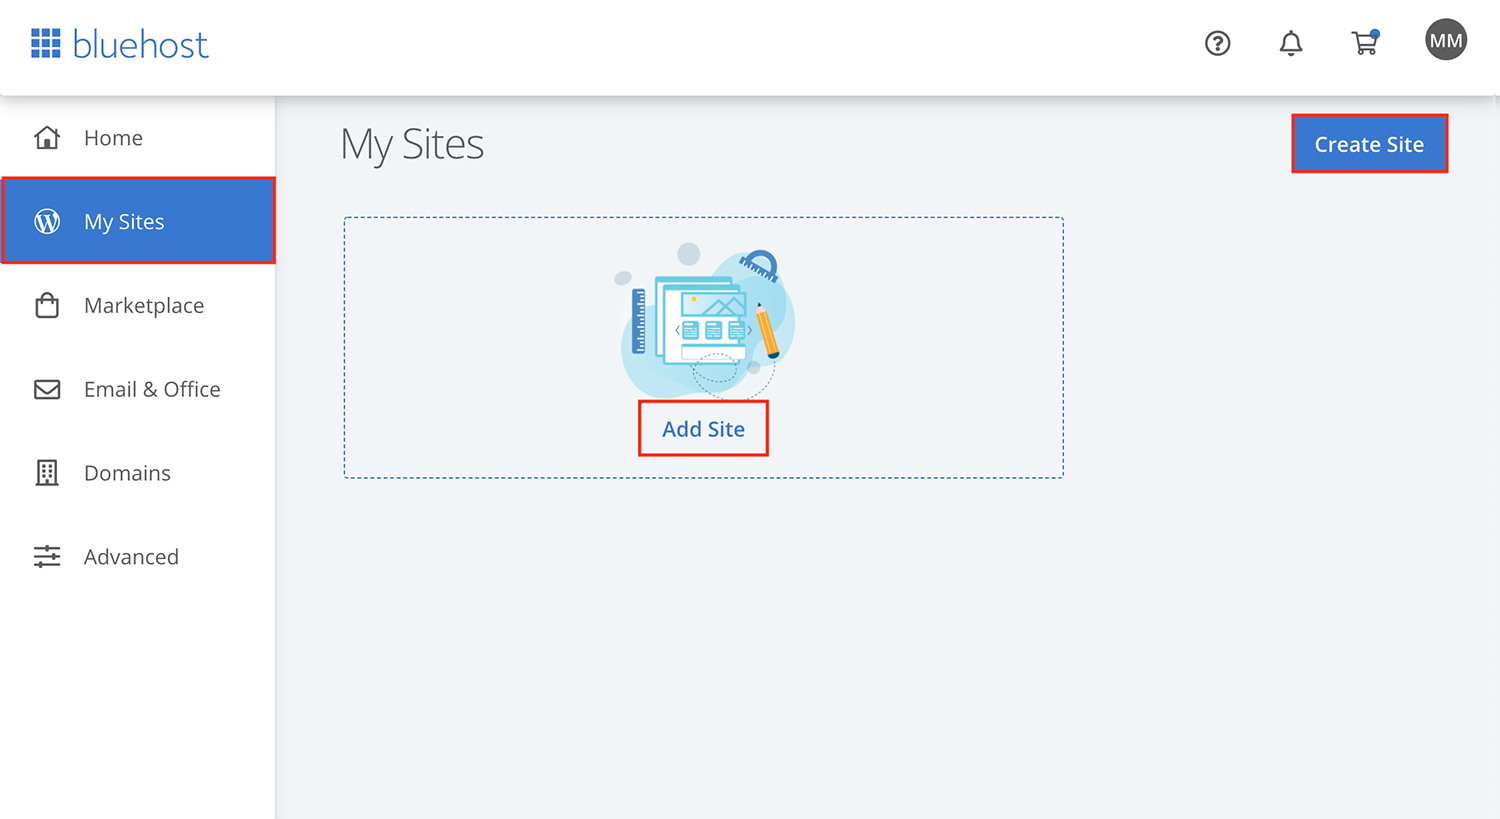
The installer will take a couple of minutes to install your application. Once done:
- Click “My Sites”
- Find the domain install and click “Log in”
Note: After installing your WordPress and successfully login to your WordPress Dashboard (with your username and password) you no longer need to login through the Bluehost website. Next time, to access your WordPress Dashboard you can simply:
- Go to your login URL: “www.yoursite.com/wp-admin”
- Type in your Username and Password and click on “Login”
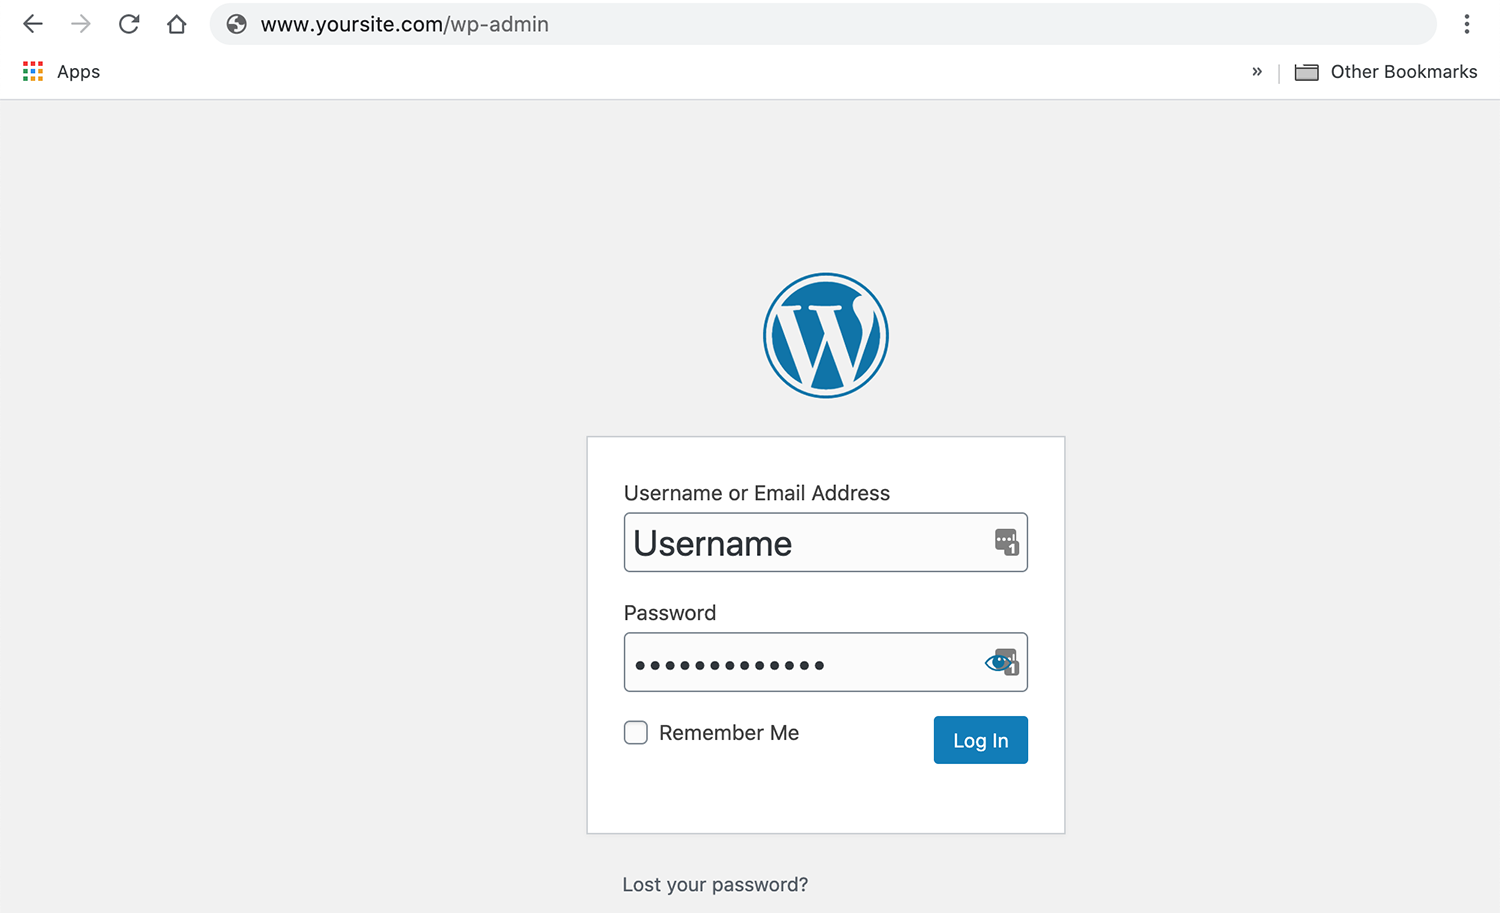
WordPress dashboard
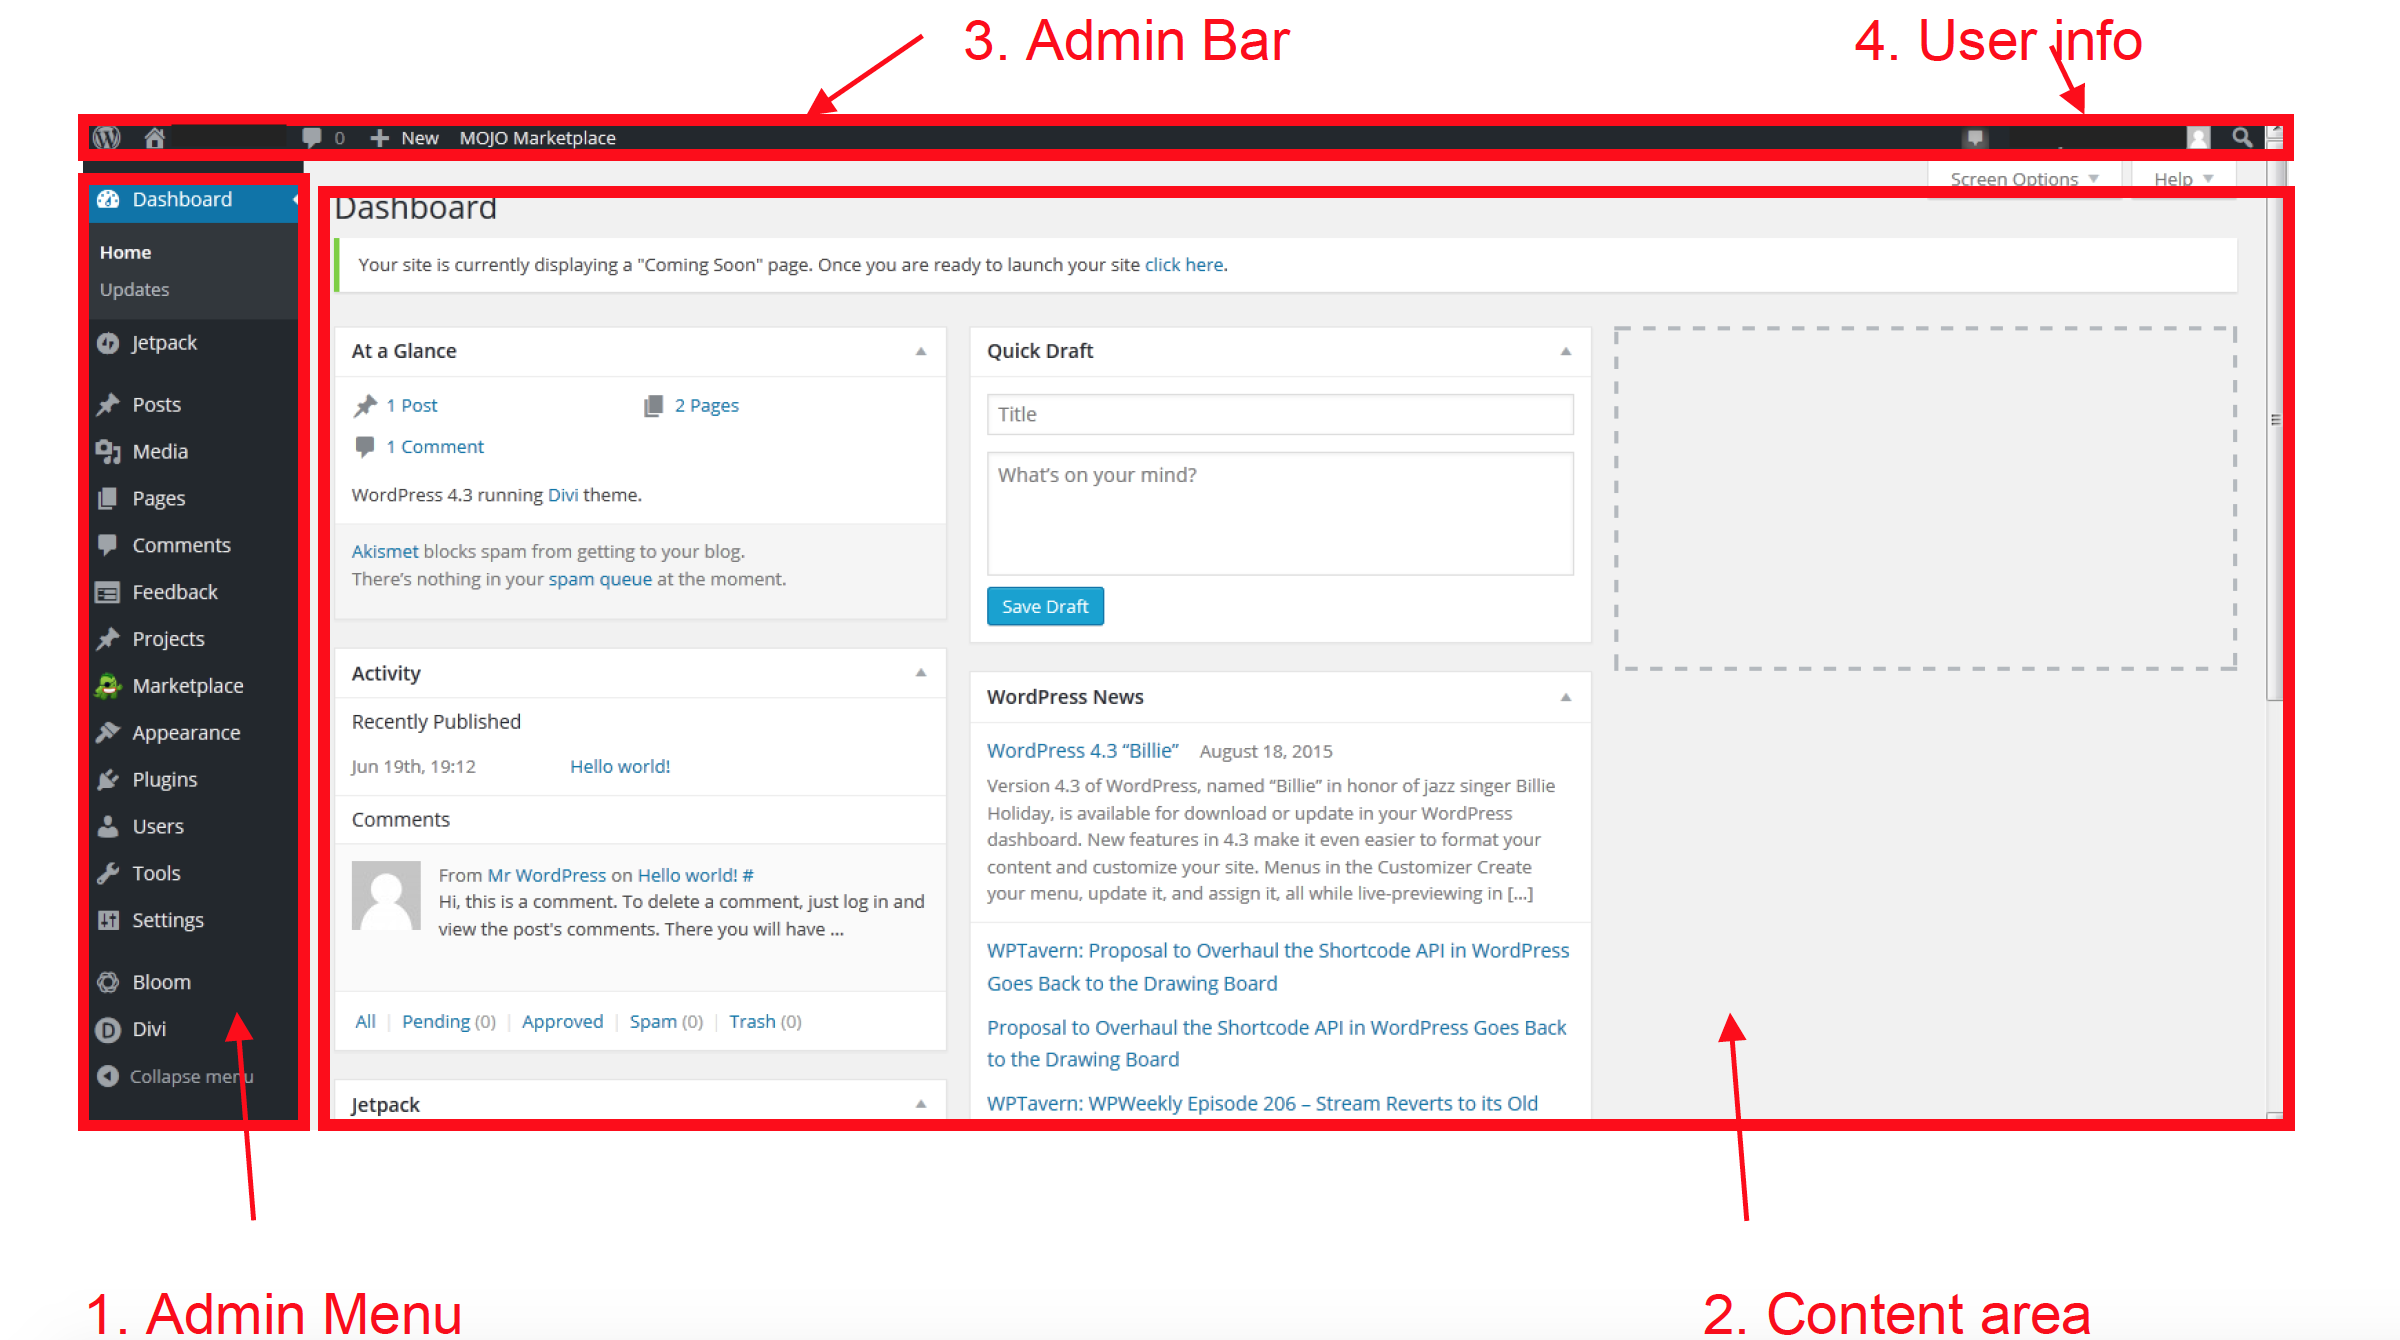
Welcome to the WordPress dashboard.
Install and activate Divi Theme on WordPress:
- Go to https://www.elegantthemes.com/ and login
- Click on “Downloads”
- Under Installing Divi, Click on “Download”
- Now login to your WordPress dashboard. (through www.yoursiteurl.com/wp-admin)
- Click on the “Appearance” in the Admin Menu (on the left side of the WordPress Dashboard)
- Click on Themes
- Click on “Add new” or “Add new Theme”
- On top click on “Upload Theme”
- Now, either drag and drop the zip file we downloaded (on step 3) in the box or
Click on “Choose file” locate the Zip file we downloaded and click on “Open” - Now click on “Install now”
- Once the file is uploaded you can click on “Activate”
Congratulations, Now the divi theme is installed and activated on your WordPress website.
Install security Plugins
Now it’s time to install two important plugins on your site, Wordfence Security and UpdraftPlus. Wordfence Security plugin makes sure your site is safe from attacks and UpdraftPlus keeps a backup of your site just in case.
Install, Activate and Optimise Wordfence Security
- Click on “Plugins” in the Admin Menu (in the WordPress dashboard)
- Click on “Add new”
- In the search box, write “Wordfence Security”
- In the search result, find “Wordfence Security – Firewall & Malware Scan” and click “Install”
- Click on “Activate”
- At this point Wordfence plugin might automatically ask you to provide an email address so they send you the security alerts (if the site is under attack or a plugin needs updating, or someone has tried to login to your site, and more). Write your Email Address. And click on “Get Alerted”
- If the Wordfence plugin didn’t ask you automatically for your email, then click on “Wordfence” in the admin Menu.
- Click on “All Options”
- In the “General Wordfence Options” Write your Email Address. And Click “Save Changes”
Now let’s optimize the firewall:
- Click on “Wordfence” in the Admin menu
- Click on “Dashboard”
- On top of the page there is a message saying that you should “optimise the Wordfence Web Application Firewall, click on the “Click here to configure”
- In the window that just popped up, click on “DOWNLOAD.HTACCESS” and save the file on your device
- Next, click on “Continue”
Install and Activate UpdraftPlus
- Click on “Plugins” in the Admin Menu (in the WordPress dashboard)
- Click on “Add new”
- In the search box, write “UpdraftPlus”
- In the search result, find “UpdraftPlus” and click “Install”
- Click on “Activate”
- Click on “Setting” in the Admin Menu
- Click on “UpdraftPlus”
- Click on the “Settings” tab, And choose how often you want the plugin to backup the site. (for example twice per week, or three times daily if you’re going to make a lot of changes on a daily basis)
Adding logo and favicon to your website
Add a logo to your website and adjust it
- In the Admin menu, click on “Divi”
- Click on “Theme Options”
- Under the General tab, Click on “Upload”
- Click on “Upload files” tab
- Click on “Select files”
- Locate the logo file from your device and click “Open”
To adjust the logo size:
- In the Admin Menu, click on “Divi”
- Click on “Theme Customizer”
- Click on the “Header & Navigation”
- Click on “Primary Menu Bar”
- Make the adjustments you like and then click on “Save and Publish”
Add a favicon to your website
- In the Admin menu, click on “Divi”
- Click on “Theme Customizer”
- Click on “General Settings”
- Click on “Site Identity”
- Click on “Select Image”
- Click on “Select Files”, locate favicon file on your device and click “open”
- Click on “published” to save
Note: The favicon size is recommended to be 512×512 pixels and in .png format.
Adjusting the WordPress General settings
- In the Admin Menu, click on “Settings”
- Click on “General”
- In the “Site title”: Enter the name of your website
- In the “Tagline”: Enter the site’s slogan or in a few words, explain what your site is about.
- In the “WordPress address” and the “Site Address”: Enter the URL of your site (https://www.yoursite.com)
- In the “Administration Email Address”: Enter Email address for Admin purposes.
- Chose the “Site Language”: English
- Adjust the “Time Zone”, “Date Format”, “Time Format” and “Weeks Starts On” based on your location and preference.
- Click on “Save Setting”

Section 3 – Front end: Build/design your website
Create a new page
- In the Admin menu, Click on “Page”
- Click on “Add New”
- Write the name of the page (example: Home page, About me, Contact me…)
- In the “Divi Page Settings” panel on the right, under “Page Layout” choose: “No sidebar”
- Click on “Use Divi Builder”
- You have three options now:
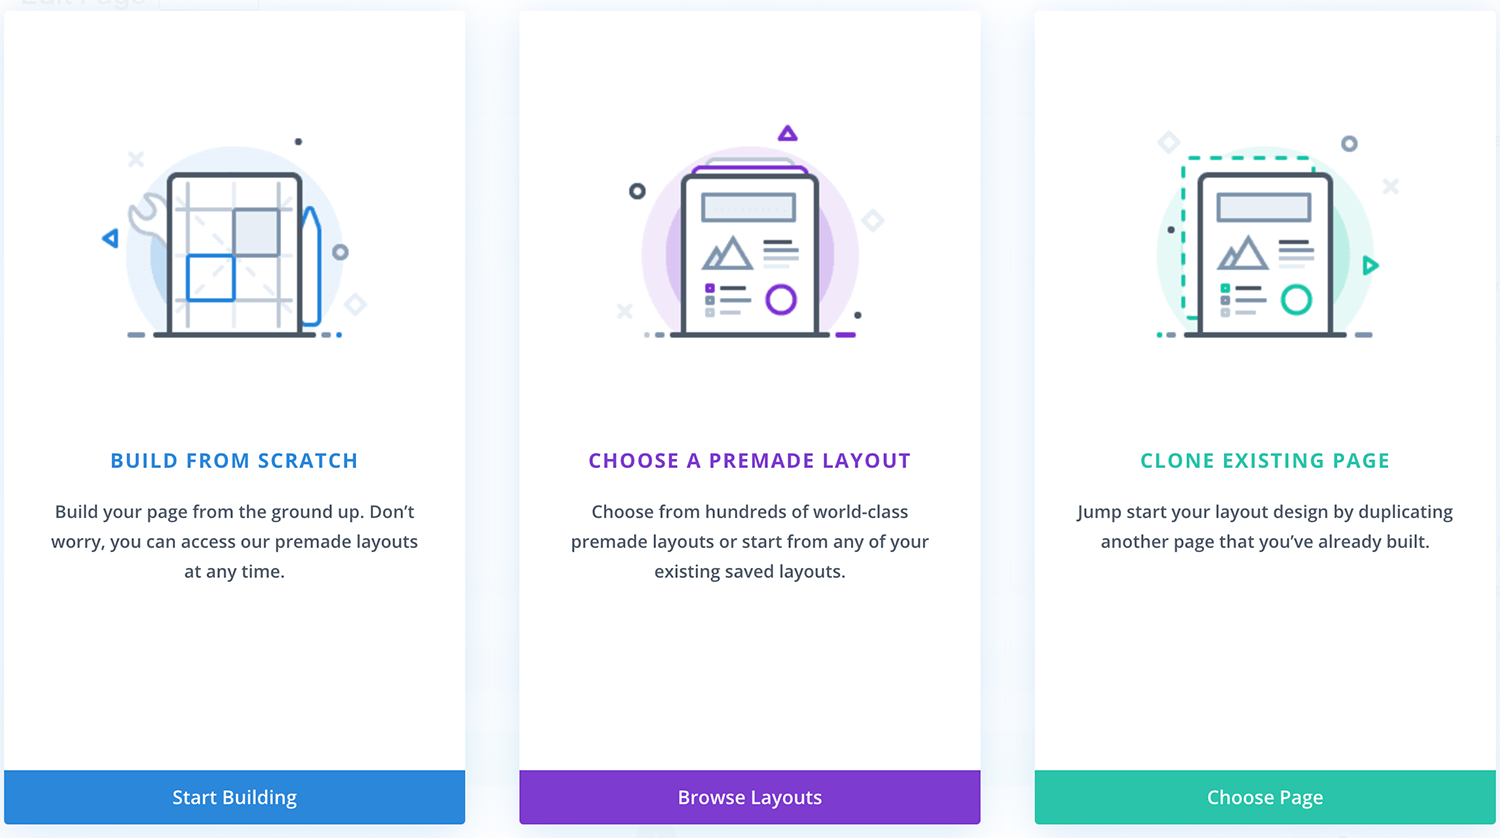
a. Build a website from scratch
b. Choose a premade layout: We recommend this option especially for newcomers
c. Clone existing page
7. Click on the “Browse Layouts” to choose a premade layout.
8. Now you will see dozens of professional-ready-made-layouts for different purposes. On the left side you can search a keyword to find layouts suiting your purpose.
9. Click on one of the layouts that you like.
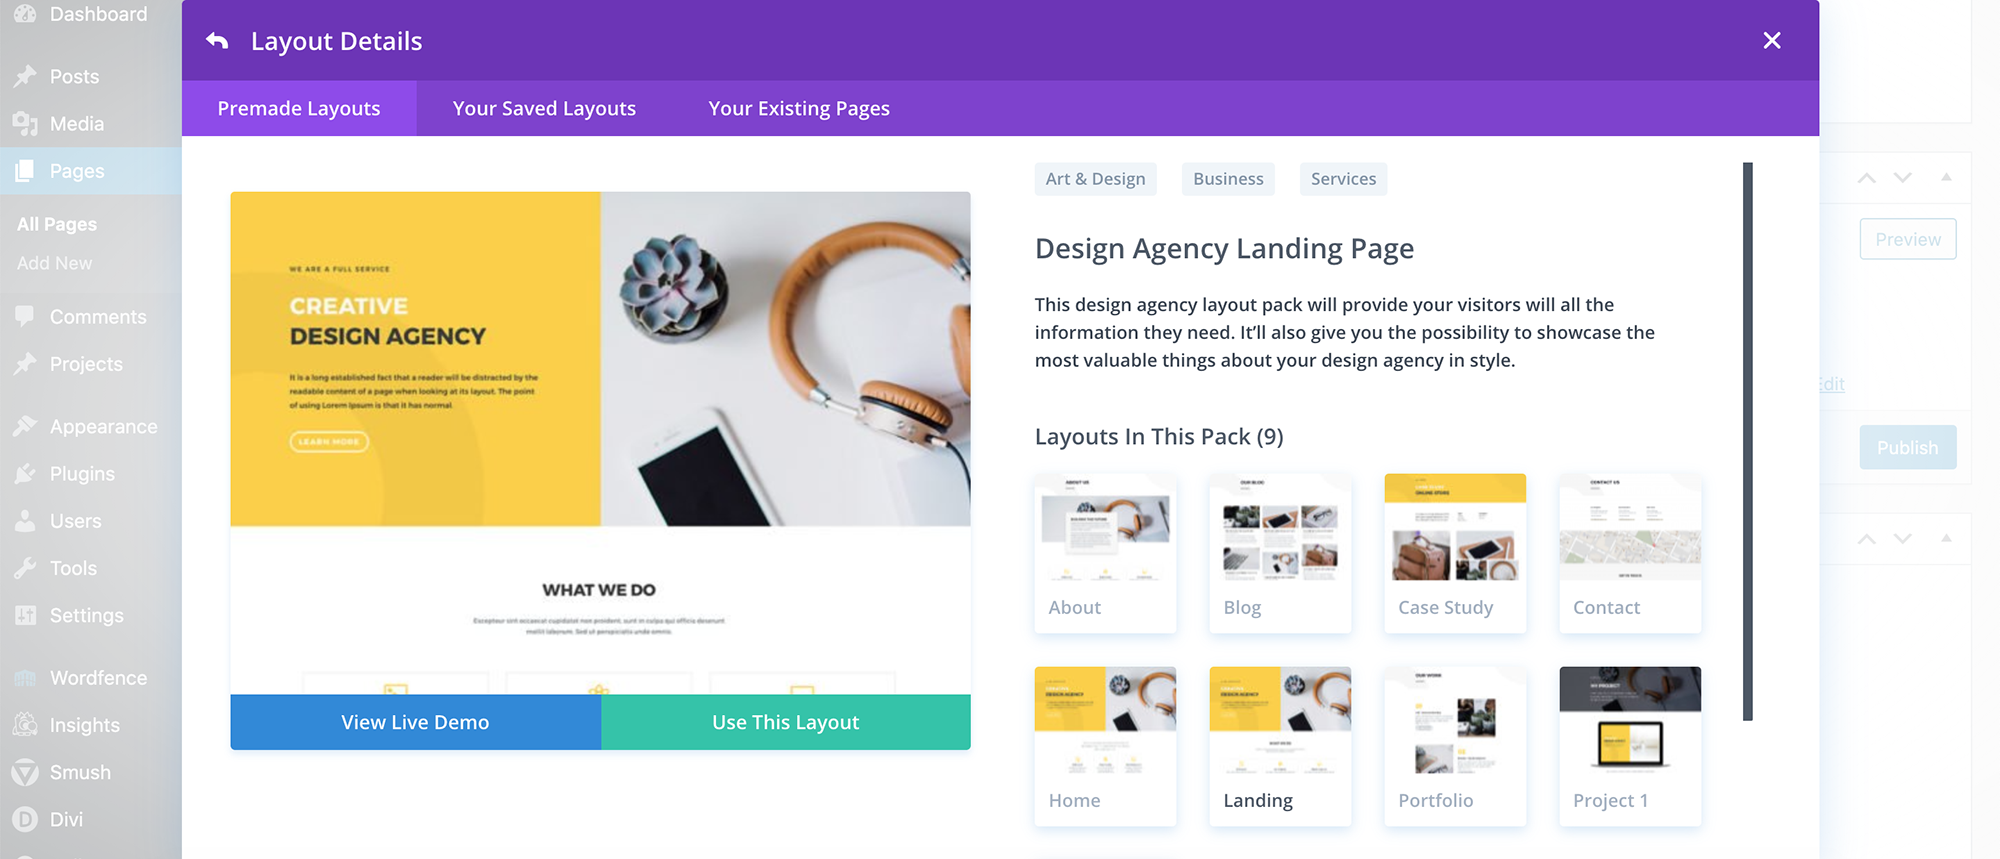
10. Click on one of the small thumbnails (on the right side) to see different pages of the selected layout. For example you might just want to use the Portfolio page or the Landing page.
11. After selecting a page, by clicking on the “View Live Demo” you can see the layout live. This option is great because when it comes to websites pictures cannot do justice. You need to see the page live, to see all the functions, movement styles, animations etc.
12. When you are happy with your choice, click on “Use this Layout”.
13. Now the structure is made. All you need to do is to make your own adjustments (such as changing the texts, colors or images) on the layout and make it your own.
14. Click on “Preview” whenever you want to check the result of your work.
15. Remember to click on “Save Draft” in the right panel so you don’t accidentally lose your work.
16. You can also click on “Publish” once you are ready with the design.
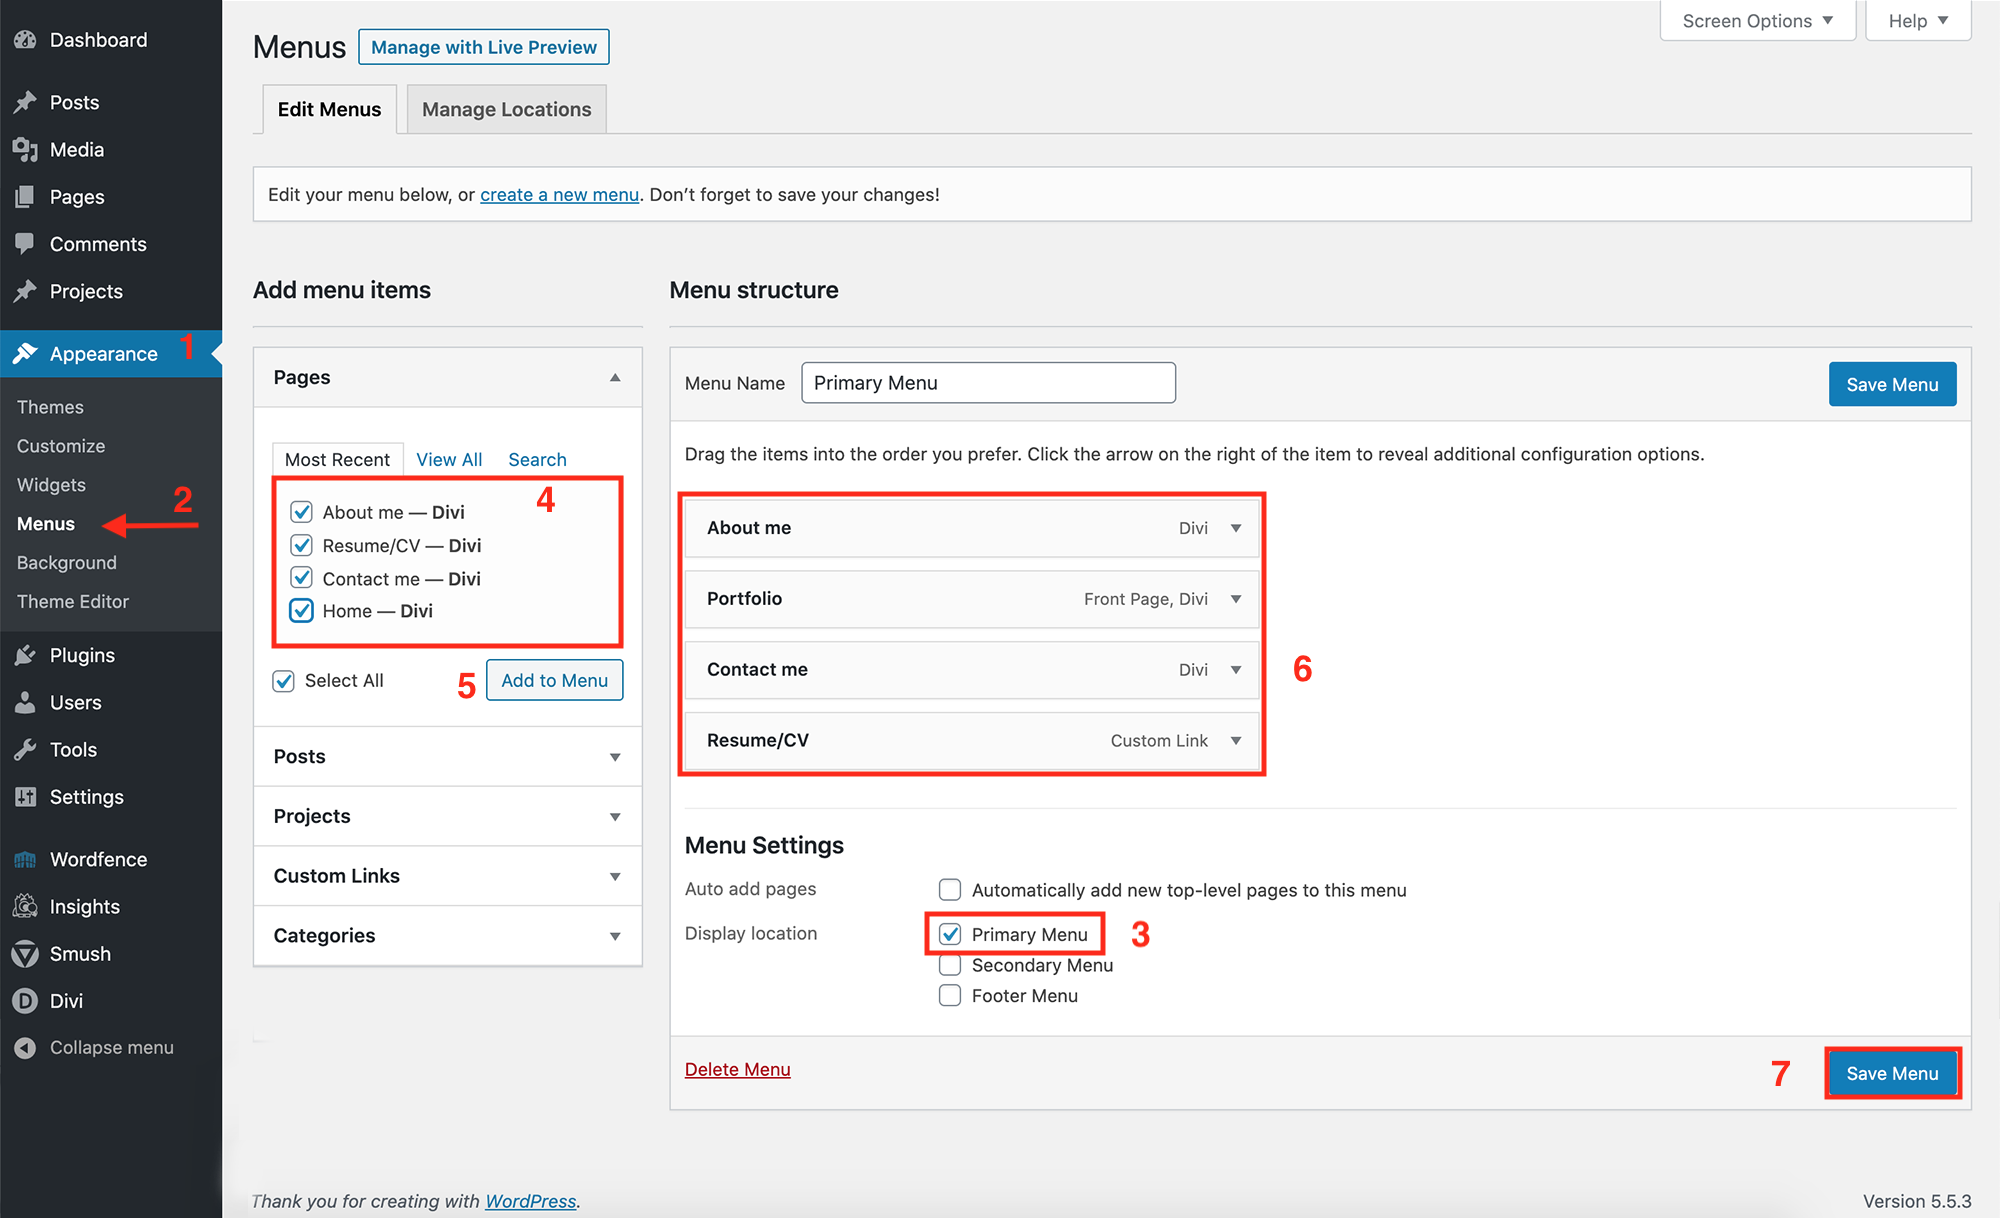
Note: If the page is published but has not been added to the primary menu it would not be visible on the site. You should add the page to the primary menu.
17. One other way to edit or design a page is to do it from a “front-end” perspective. Which then allows you to see your changes live which makes the process faster and much easier. So go ahead and click on “Build On The Front End”.
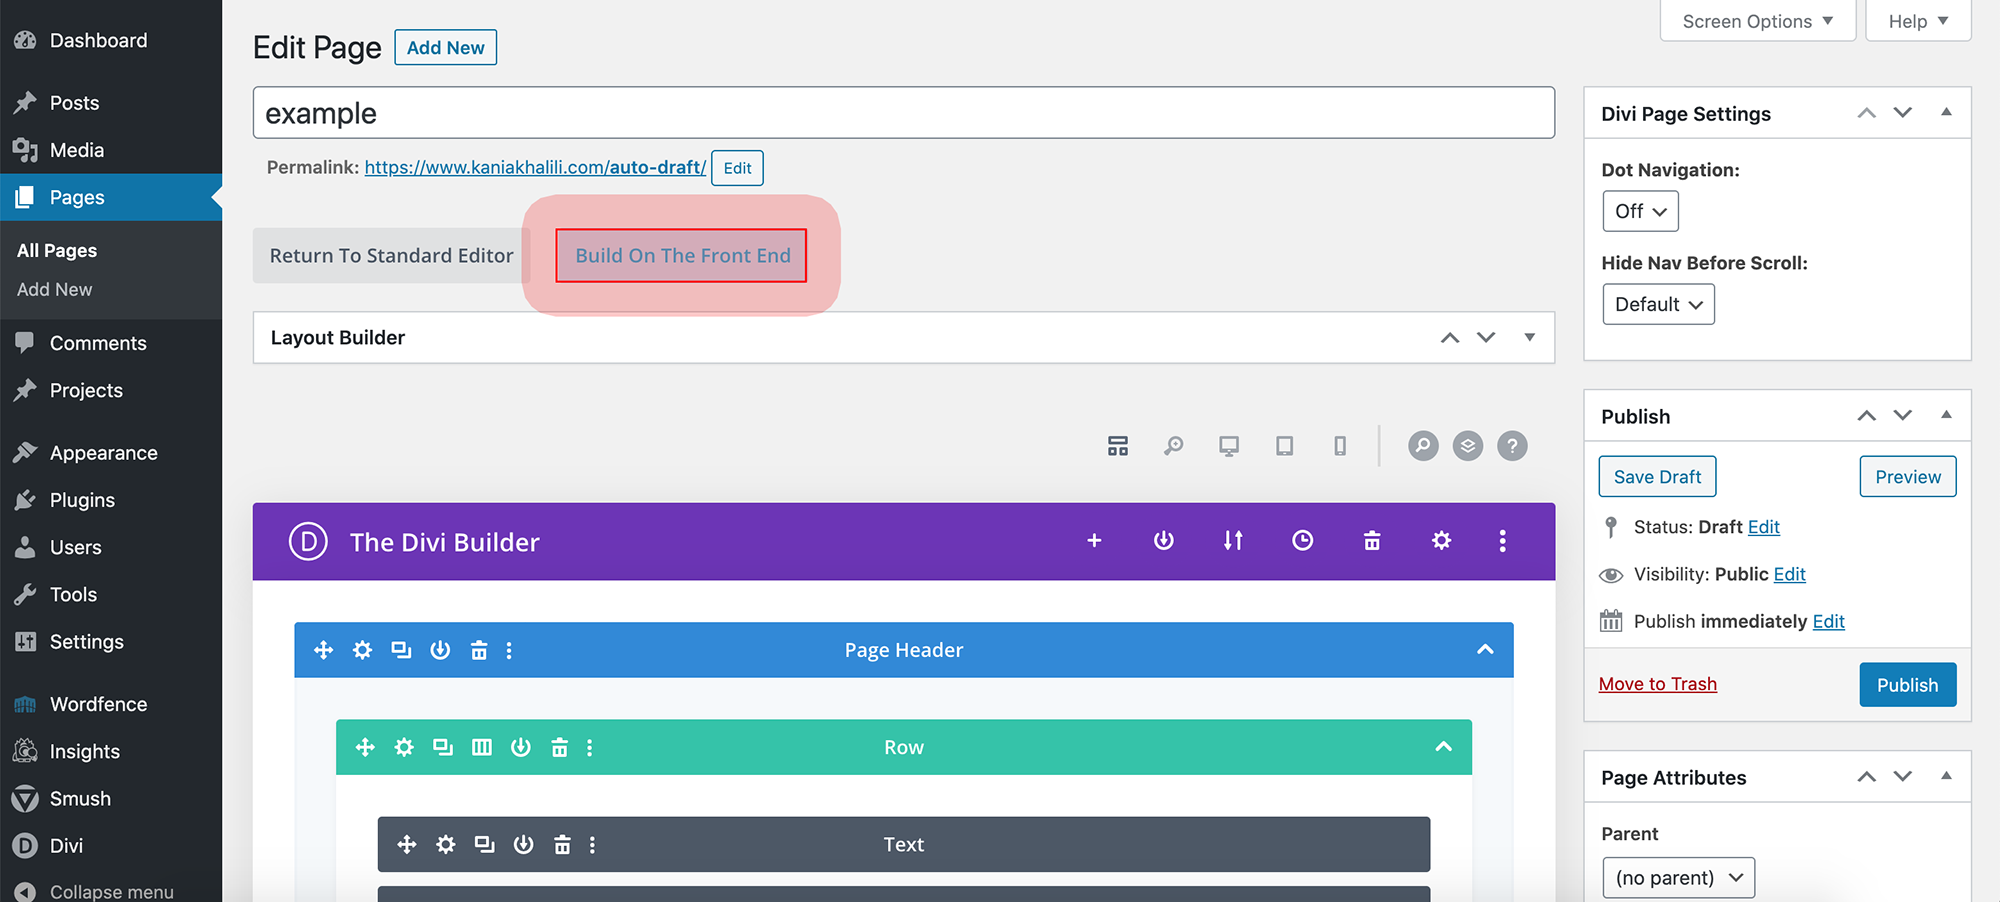
18. In the “Visual Builder” section you will learn about modules, rows and sections and how to change/create/remove them.
Introduction to the Visual builder
Section 4 – How to maintain your website
How to Update Themes and Plugins
How to Scan and backup your website
Log out of WordPress
- On right side of the “Admin bar”, hover over your domain name
- Click on “log out”
How to contact the support team?
Both Bluehost and Elegant Themes have amazing support teams. Bluehost has a live 24/7 support, which means in a matter of seconds you can start chatting with a real expert.
Some of the reasons you might need to contact the Bluehost support team:
- If you suspect you have been hacked.
- You cannot login to your website.
- Your website is down and you see an error.
- You want to change your billing information.
Bluehost support:
- Go to https://www.bluehost.com/
- Click on “Chat” on the top right menu and a Help chat will pop up.
- Fill in the “name”, “Domain” and “domain” and click “Next”.
- From the Topic tab, select your issue. For example Billing, Malware/Security, Tech support others.
- Choose one of the options from the “Description”.
- In the last part, write your problem or reason for contacting the support team. And click “Find Help”
- Before starting the chat, they will ask you to verify your account by giving the last 4 digits of your Bluehost account password. Example: If your password is “STRONG123AB”, you only need to give “23AB” to the support team.
- Sometimes, instead of asking for the last 4 digits they will send a digit to your Bluehost account. So you would login to your Bluehost account and the digit will popup. All you need to do is to copy the digit and give it to the support team.
Elegant Themes Support:
- Go to https://www.elegantthemes.com/
- Click on “Account” from the top menu
- Fill in username and password and click on “Member Login”
- Click on the pink chat icon at the bottom anywhere on the website and select “New Conversation.” (Be sure to add your Website URL so they can better assist you.)
Note: If you close the chat box, don’t worry, you will receive our response via email automatically. Your message will not be lost.

